Saturday, 26 March 2016

Marushin Ruger Mk1 Bull Barrel

I always liked the look of these and ever since I got a chance to fire a real one when I was over in the states some time back I wanted an Airsoft version. Compared to the other handguns I fired this was amazingly easy to handle, pointed very naturally and the low recoil made for extremely accurate rapid fire. While a pretty anemic round compared to centre fire cartridges I figure that a couple or three .22 long rifle rounds would take the fight out of most people and a shot to the head would likely ruin your day.

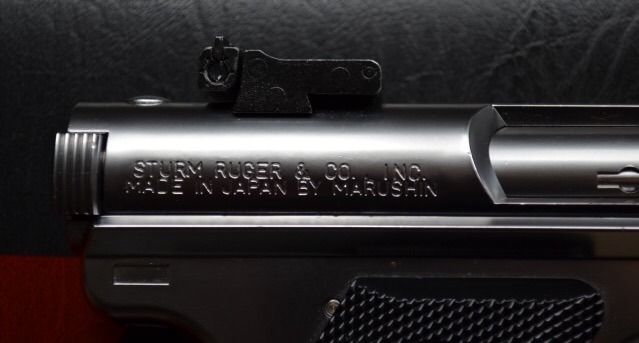
That said, I finally managed to blag a stainless bull barrel version off one of the forums; a Marushin which has all the right trades and looks pretty cool. The gun is essentially full plastic but the sights are metal with target type front sight and an adjustable rear sight. I didn't get a manual with the gun but it's simple enough to figure out and a quick google supplied said manual and take-down guide.

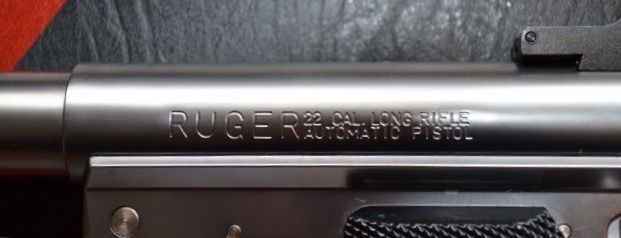
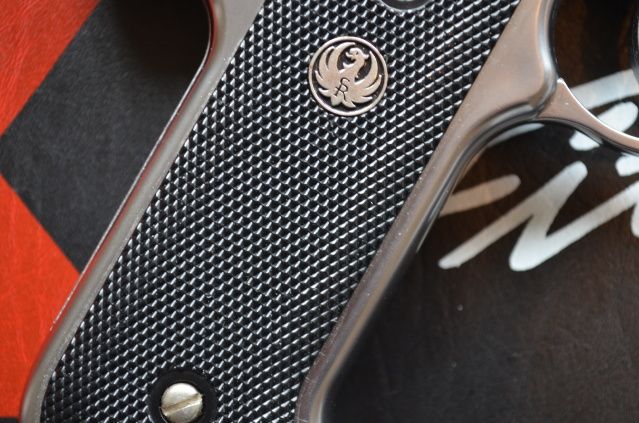
Overall the gun looks good; I like the bull barrel and the trades are pretty good - despite the 'MADE IN JAPAN BY MARUSHIN' bit. The fit of the external plastic parts are pretty good and the fact that the receiver, barrel and cocking lever/thingy are separate actual adds to the realism. The metal rear sight had a lot of play but some strategically place aluminium tape has firmed it up and, although the blade can still be moved slightly back and forth, it's orders of magnitude better. The trigger pull is long and heavy as is expected of a non-blowback gun but not unduly so. There's a bit of slack before the trigger engages and a very slight roughness just before it releases the hammer. No big deal and I'm sure I can improve it. 

However, give the gun a shake and it rattles. Not quite like a set of maracas but not far off :) Only kidding but it's annoying enough to me that something needs to be done and, since these are moving parts, aluminium tape is unlikely to cut it. Do bear in mind though that for most people it's absolutely fine; I annoy easily. Out of the box the gun perform flawlessly and I can't fault the overall quality.

Taking the gun apart to it's main components is straight forward and dismantling it further is pretty easy as well. It breaks down to six main parts; the bull barrel, the slide, the inner barrel assembly, the cocking lever, the main spring housing and the grip. The grip contains three sub-assemblies which from back to front are the hammer and safety, the trigger mechanism and the loading lever. The gun works by simultaneously cocking the hammer and pulling back the inner barrel assembly to load a bb when the trigger is pulled. There is no hammer sear and the hammer is released simply by pulling the trigger all the way back. The safety works  by engaging a notch in the trigger bar preventing the trigger form being pulled. I'm not sure if the hammer is locked when on safe but since it's completely internal it is unlikely to be able to activate the magazine release valve without the power of the mainspring behind it. Putting it back together from completely stripped is slightly more challenging but three hands are not required and it goes back together with little trouble.

Obviously, the whole point in taking it apart was to iron out the niggles and improve what is already a decent bit of kit. My main task was to polish all the moving bits that came in contact with other bits - moving or otherwise. Having done that it was pretty clear that the hammer tolerance was generous and the main cause of the rattling but due to the way it's designed no improvements came to mind. The trigger take-up slack was dealt with by inserting a small square copper shim where the trigger meets the loading lever mechanism and a standard 0.1mm gearbox shim sorted most of the side to side movement - which to be fair was minimal but that's just me. It improved the trigger no end with a smoother pull, and no sign of the slight roughness just a crisp release. However, it did have the effect of not returning far enough to to engage for the next shot which was a bit of a pisser. Much head scratching later I was about to dismantle it to remove the shim when I decided to see if inserting the magazine would make any difference. It did. The gun worked flawlessly. Essentially, when the magazine is in the trigger bar is prevented from dropping the fraction of a millimetre that prevented the trigger reset.

I haven't chronoed it yet but from all the indications I've come across is that it runs hot. I'll see what it does on Ultra gas and drop to 144 if it's still over 350fps. Overall, I'm quite delighted with this while the silver finish isn't exactly skirmish friendly I can see me using it anyway.

The photos this time aren't mine and the qudos goes to k.a. on the Zero-In forum that I bought it off of. 

Thursday, 22 October 2015

Marui MP5K/SP89 Upgrade - Part 1 and a bit

Well, I decided to put a thread adaptor on the MP5K. I ordered a King Arms standard threaded one and being steel it does look quite cool. I prefer the look of it to the MP5K with the tri-lobe adapter – technically an MP5KN –  which to me makes it look like you’ve just ditched the stock on your PDW. I decided it needed to be tapped and threaded to allow a grub screw to secure it since there was the possibility that it could move when attaching either a suppressor or sound hog. In theory, a sensible decision. In reality, not so much.

The hole drilled quite easily with the indicated drill size for an M3 thread and I proceeded to tap out the hole. Just as the tap started to protrude into the threads that take the adaptor it snapped. Well, shit. I now had about 1½mm of tap sticking out either end. A pair of pliers failed to grip it and simply broke of the remaining bit of tap on the outside. The next step was to drill the tap out. Funnily enough, it turns out that taps are really fucking hard and promptly blunted the drill bit. The outside part was now virtually flush but a quick run over with a tungsten Dremel grinding bit took it down to a smoother finish. The only option was to do the same on the inside, wearing down the original threads until the broken tap was ground down flush to the depth of the thread. It actually now looked  pretty cool with the interrupted thread. The outside is a bit the worse for wear but it’s hidden by the handguard when fitted so ultimately of little concern.


Of course, it turns out that the King Arms adapter proved to be an extremely tight fit anyway and with a reasonable amount of brute force is now more or less permanently attached. It’s going nowhere.

I still haven't finished the upgrades but having discovered the Gate PicoSSR 3 mosfet, which is absolutely tiny, I've ordered some direct from Gate in Poland, one of which will go into the K. 

Tuesday, 29 September 2015

Marui MP5K/SP89 Upgrade - Part 1

My long in the tooth Tokyo Marui MP5K with SP89 grip. Other than adding a front sling pin and silver dry brush to give it that used look this is bog standard. Even the battery is an old 1,400mAh NiMH that hasn't been removed in eons.

Now it's dead. Expired. Ceased to cycle.

Obviously, the sensible thing to do would have been to check the battery so with that in mind I never bothered my arse and decided that it was something more terminal. In my defence, I had always intended to upgrade this anyway and not working was convenient excuse. As stated in a previous post, I wanted 320(ish) fps and as many rounds per second as I could wring out of it. However, as long as its under 350fps it'll be okay and if I can get 900 rounds per minute that would be great!

I thought I had a Lonex Titan high speed long motor kicking about but it turns out that it is a short version. Bugger. Loathe to spend another fifty quid on a new motor some research on tinternet turned up the SHS motors which seemed pretty decent for around £27 if I was willing to wait until it arrived from Hong Kong or £33 if I wanted to get it from the UK. Grudgingly I forked out the thirty three notes; and the fucker's still not here.

Tool Door. Every door needs hex keys and pliers.
I'd have liked a PDI barrel but they don't make one for the K. They do make one for the PDW though it's a tad longer extending into the flashhider. I found that the PDI 6.01 added about 5% to the muzzle velocity of the TH G18C AEP. That's around a 10-15% increase in efficiency and I would expect a similar result with the short barrel in the MP5K. Spring wise, a Guarder SP100 should do the job though with some spacers to fix the angle of engagement and a bearing spring guide this will likely come in at the wrong side of 350fps - my site limit. I decided to short stroke the gearbox by two teeth which should drop it down by 20fps or so.

The piston is a full metal teeth job which on reflection makes it fairly heavy but I've left the bearing out of the piston head which brings the weigh back down slightly - I'm sure shaving two metal teeth off has had negligible affect though... I did decide to swiss cheese it but gave up - the way I'd drilled it precluded cutting more out so the effect has been minimal and is down to my lack of patience and shit drilling than anything else.

On a side note, the tool door is now looking quite full with almost everything usable or used for airsoft work - although the Knipex mini bolt cutters  and wire snips have yet to come into play...

I had originally intend to run the motor on a Firefox 7.4v 1,600mah LiPo but with the way the wiring comes out of the battery it's not possible to fit it without crushing down the wires where they come out of the battery; it would be useful if battery leads came out the end of the battery rather than the side! However, I've ordered aa Turnigy 7.4v 1,300mAh 25C LiPo which looks more than suitable. Overall length is similar to the Firefox at 168mm compared to 170mm but crucially it's slightly thinner at 18x12mm rather than 20x12mm. I did have a look at using a rear wired battery connector which would cut a significant amount of cable out of the circuit but space is at a premium and routing is tight once the end plate is on. The connectors take up a surprising amount of space so I'd probably end up having to use a smaller 1,000mAh LiPo. So, for the moment the front wiring stays.

The bushes on the Marui gear boxes are 6mm - tiny by today's standard - and are plastic to boot. This is actually fine for the standard Marui power but since we're upping that by a fair margin I'll fit some metal bushes to be on the safe side. Obviously, it'll need re-shimmed but that should be a straightforward if time consuming job.

So, to summarise, SP100 spring, short stroked by two teeth, metal bushes, bearing spring guide, SHS High Speed motor and a 7.4v 1,300 25C lipo. Currently in bits on the kitchen table/trolley thing.


Saturday, 12 September 2015

Expired Marui MP5K

Well, it ain't working 😕

Battery is okay - powers a UMP just fine - and the fuse is intact. Hmmm. Looks like it has to come apart for an examination and, since disassembling a Marui MP5 is a pain in the ass, I'll do some upgrades while I'm at it. The target is around 330fps and whatever rate of fire I can wring out of it.

With that in mind I've got a high speed motor kicking about somewhere which I think is a long shaft model for a version 2 gearbox and I've just received a piston head and piston in the mail which I ordered specifically for this. I was quite impressed with the result I got from short stroking the cut down G3 by a couple of teeth and I think I'll do the same here. I'd like to be able to put a silencer on it  or more likely some sort of sound hog. I tend to find the most impressive guns are high rate of fire either nearly silent ones or high rate of fire loud as fuck versions - the sewing machine sounding ones don't cut it in my opinion 😉. That said it needs a screw in fitting so I'll have a hunt about something completely inappropriate. 

I'll get some pictures up in the next post.

Sunday, 19 July 2015

Sector Clip thoughts...

Well, once more the MC51 is in bits in an attempt to fix the strange, high fps one minute low the next. My thoughts turned to the sector clip.

Essentially, the sector gear - so named because it only has teeth on one sector of the circumference of gear -  is the one that pulls back the piston and lets it go when said sector runs out of teeth. It also serves two other functions one of which is to pull back the tappet plate which, in turn, pulls back the nozzle thereby letting a bb move up from the magazine. After a point, the tappet plate slides off the pin that is pulling it back and the tappet plate with attached nozzle move forward shoving the bb into the barrel and, hopefully, sealing it. A fraction of second later the piston also slams forward pushing the bb out the barrel - preferably at a reasonable pace.

Still with me? Good.

However, the thoughts behind a sector clip is that instead of a pin we have a small rounded triangular(ish) bit of plastic or metal that attaches to the pin and expands the pins influence to either side. Basically, the tappet plate now starts to be pulled back earlier and moves forward later thereby giving a bb more time to get from the magazine into a position in front of the nozzle. Fine in theory. I find that while the tappet plate moving backwards earlier is a good thing I'm not convinced that moving forward later is a benefit. In fact, I'd say it is distinctly not a great idea.

As far as I can see, the problem lies with the tappet plate not returning the nozzle to its position quickly enough. In other words, the delay to allow the bb time to get from the magazine to a position in front of the nozzle means that the piston can complete it's cycle before the tappet plate is fully forward resulting in a poor air seal and significant drop in performance. Two real options here; beef up the tappet plate spring or modify the sector clip. Removing it is also an option but you do lose the benefit of the nozzle moving back early.

With this in mind, I had a look at the sector clip on the MC51. Unlike most sector gears there is no tappet pin as such - the symmetrical sector clip and pin are two pieces of metal fixed together. My solution was basically to remove some material from the side that delays the return. As it transpires I took most of that side off leaving the clip somewhat lopsided; while the nozzle retracts earlier it returns with only minimal delay. After polishing it smooth I refitted it.

Worked like charm.

Thursday, 11 June 2015

Upgrades. Perfect and not so perfect...

Well, got the various bits for the guns...

The Type 89 motor was quickly swapped out for the Lonex A3 motor. A test fire immediately blew the fuse - standard Marui 15amp. I swapped it out for a 20 and it blew as well. The 25 works fine! The motor is obviously drawing between 20 and 25 amps. I haven't checked the rate of fire but it sounds fine. I noticed that even at maximum the hop was not lifting the 0.25g bbs as well as it should. I popped the barrel out and everything looked fine but obviously, the hop wasn't  being compressed enough. After a bit of head scratching a couple of layers of insulating tape on the end of the hop that pushed on the bucking and we were good to go. After some test firing out the back garden I returned with a suitable grin. Perfect.

Fitting the parts for the G3/MC51 were next; a Marui hop, and a Lonex nozzle basically. However, I decided that I would short stroke the gearbox by two teeth and see if that made any difference to the gun; have Dremels, have grinding wheels so, "Why not?". The Murui hop unit is noticeably better quality than the stock one. It all went very well and was back together and ready to rock in just over an hour. Testing was... interesting. It would fire the first shot at around 295 fps and the second at about 195fps. WTF! Anyhoo, for the moment I have given up in disgust. However, some thinking - not something I apply often to airsoft, purchasing or upgrading - makes me wonder if it is the sector clip that is delaying the sealing of the nozzle. Basically, a sector clip will open the nozzle early to allow a bb to feed but by its design it will also slow down the closing so the next step is to get the little bugger out of the sector gear and grind down the closing side - the right hand side when looking down on it fitted to the sector gear.

That's next. Probably tomorrow, or the weekend. Maybe.

Saturday, 30 May 2015

Two guns not up to spec.

So, a couple of guns are playing up. The newest is a JG-108 - basically an MP5 sized G3 rifle complete with sliding stock. Sometimes known as a Heckler & Koch MC51 - although, technically, it's not; an HK51 variant would be a more accurate description. It seemed like a good idea at the time. On reflection, I should have bought the Classic Army version. The other is a G&G UMP bought second hand without a gearbox. The idea was to custom build a V3 gearbox for it but the UMP gearbox requires some custom bits so I caved and ended up buying a complete new G&G gearbox. Again, it seemed like a good idea at the time... :)

Both guns are firing at around 255-265 fps. They should be around the 330 mark.

It's probably air-seal issues with both. I've discovered in the past that no amount of fiddling I've done will fix air-seal issues on A&K, Cyma or Jing Gong guns. The best solution  I've found is simply to replace the cloned part with the original or an aftermarket bit. In this case, for the HK51 a Tokyo Marui Hop Chamber, Lonex Airseal nozzle, Lonex Cylinder, Lonex Bearing spring guide and an M100 spring should put that right. I've got shed loads of Nitrile o-rings so I'll swap that as well. 

With any luck the UMP is just a piston head o-ring problem but, I've got another M100 spring on order so I can swap that over if needed. The battery compartment door is not staying closed; the door itself is fine it seems to be the notch in the upper receiver that has worn. A bit of brass cut to shape and epoxied in should solve that. I can't remember but I think I fitted an SHS high speed motor in either this one or the DE one but I've got a spare Lonex A1 short motor that I'll drop in if its a standard one. The G&G has been rewired to deans and I've recently bought a couple of 9.9v LiFePo4 batteries which fit - just.

On a side note, although firing at a more respectable 320fps and despite using a 20C 7.4v Lipo, the TM Type 89 is firing a tad slow for my liking; that 700rpm sewing machine noise just irritates me. I've ordered a Lonex Titan A3 high speed motor which will hopefully be an improvement .

Wednesday, 20 May 2015

Tokyo Marui P90 and Type 89 tweeking

I don't really mod my guns as such more tweek them to iron out little idiosychracies that are annoying as fuck or to optimise their performance. Generally I prefer my guns to have a slightly higher rate of fire - enough to avoid that sewing machine noise - and as close to site limits as feasible; around 350fps but anything over 320 with 0.2 bbs is fine. The following two are mid range guns from Tokyo Marui that have had the treatment.

Tokyo Marui P90
This was one of my first guns and by far the easiest to work on. Original work involved Swiss cheesing the piston, changing the piston head, adding metal bushes, a more powerful spring, a G&P M120 high speed motor and fitting a PDI 6.01 stainless barrel. It was and I'm sure still is very prone to double firing on single shot but after much head scratching, fiddling with the trigger mech and cut-off lever it now appears to be working fine. As part of this the wiring to the motor was redone and an Extreme Fire SW-SF mosfet was fitted.
Externally, there is a King Arms flash-hider for a Gemtech SP90 silencer, a front swivel sling and a rear mount swivel sling as well. Current choice of optics is a low rail mount Aimpoint T1.

Tokyo Marui Type 89
Mainly stock but has metal bushes and an uprated spring. While originally pushing 345fps it has dropped to around 325 to 335fps; probably due to sitting around for a while. The stock motor is excellent but I think it needs something with a bit more speed so thoughts are currently leaning towards a Lonex A1 long motor - a high speed motor as opposed to the high torque Marui version fitted as standard. Battery space is at a premium on these guns so anything bigger than a 8.4v NiMH stick doesn't fit. I have managed to source a couple of Firefox 7.4v 1,600mah LiPo stick batteries which give a slightly higher rate of fire; rated at 20C which gives about 32 amps.
Externally, a left hand selector lever is fitted as well as a RIS rail. the rail is fairly short and the low mag scope which has an integral mount only just catches the end of it. The scope rail had to be modded to allow the second securing mount to be used. The scope has a pretty good eye relief and works surprisingly well with the reticule only just above the sight line of the iron sights.

Saturday, 16 May 2015

.45 ACP inside

I was thinking that housing my Tokyo Marui 1911s required something more than an egg foam box. So, with that in mind I set out in search of something suitable and finally ended up with a Peli 1095 hardback case. 

I had already decided that I wasn't buying the chrome 1911 and the case would house an M1911A1, a Series 70, an MEU and a Detonics. 

The case itself is very robust as I expected of Peli but I still don't like the large lever lock system that it uses which, although very secure when actually locked, is very easy to overlook that it isn't actually closed properly. 

The sling that comes with it is certainly robust and functional but has that certain look of cheapness that suggests afterthought. Does he job though.

The foam is pre-cut in 1/4 inch squares. While it's functional and easy enough to cut out the curves and angles had to be cut by hand and while easy enough took ages. The red felt was flocked sticky backed plastic  I had kicking about and it worked a treat. From experience, you don't get a second chance with this stuff as it wants to stick to everything including itself. 

The Colt badge was sourced from eBay as was the .45 ACP inside sticker. I think it sets the guns off quite well although the photographs are a bit dodgy. I must dig out the camera and upload a couple of decent ones rather than the iPad snaps used here.


Friday, 15 May 2015

M14 Socom Scout Rifle

My latest craze is scoped short barrel 7.62mm assault rifles. I've got them all converted into effectively scout rifles with low mag scopes and the like. I have a couple of HK MC51 types, a SCAR-H and a FAL DSA. My current favourite though is my Cyma M14 Socom. In my not so humble opinion it rocks.


The gun itself was purchased from Gunfire in Poland priced very reasonably at just over £100 delivered. Of course, it was "hot"; firing at a site unfriendly 385fps. No problem, the spring was clipped, a Lees Precision Engineering piston head was added and adjusted for AOE and the gearbox was rewired for an Extreme Fire basic mosfet. The old motor was binned and a Lonex A1 motor added for quick trigger response. Before firing it all back together the barrel was polished to a mirror finish. The quality of the Cyma castings are pretty rough and the fire selector was replaced with a Tokyo Marui one. I also replaced the bolt cover with a Guarder USMC version.

I wanted to add a scope but the eye relief would have to be impressive and/or the scope would have to clear the rear sight. After much searching I finalised on a Visionking 1.25-5x scope and a King Arms low scope mount - the lowest I could find. I had to source 30mm scope rings but managed to get a pair or no name bits off of eBay that looked the part. The scope is amazing for the money but still sits pretty high from the sight line although I don't think it would be possible to get a scope any lower unless you're mount a true scout type scope on the front rail. As I discovered, true scout scopes are not for airsoft at least as far as price is concerned! To raise the eye level I ordered a real steel Bradley M14 Adjustable cheek rest - this cost more than the gun! Not pictured above is the edition of a Laylax front rail fitted with an ultralight weight plastic bipod. The finishing touch is is the black signature edition Carlos Hathcock national match sling from Turner Saddlery.

Overall, the gun came in at around £490 or around 2/3rds the cost of a Tokyo Marui based project. In its current form you'd need to be real close to tell the difference.

Sunday, 20 July 2014

Tokyo Marui's Colt 45s

There are three distinct gas blowback Colt 45 pistols that Marui makes - M1911A1, MkIV Series 70 and the MEU. While they are all very similar, especially the M1911A1 and the Series 70, there are some distinct differences.

Essentially, the Series 70 is an updated M1911A1 and the MEU is a modern 'pimped' 1911. The Series 70 is an updated 'civilian' M1911A1 and indeed both guns are very similar. The main obvious difference is the colour - the Series 70 is black with a silver chamber and the M1911A1 is a parkerised grey finish with black controls and black chamber. The Series 70 has a Colt medallion in its slightly lighter brown checkered grip and updated black hammer with flat silver sides whereas the M1911A1 is more business like with a simple dark checker and broader profiled black hammer. The safeties differ slightly with the newer gun having a smooth curved lever rather than a small button. Both guns have the curved main spring housing although only the M1911A1 has a lanyard loop. The other differences are more subtle. The notch on the rear sight on the Series 70 is deeper and the front sights have very slight differences, although the blade profile is the same.  The operating surfaces on the trigger, hammer, slide release and magazine release are finely checked on the M1911A1 whereas the Series 70 and the MEU are grooved. The beavertail on the Series 70 is a slightly different profile but it's very subtle. The MEU is certainly a Colt 45 but the differences on this gun are more pronounced. A large, upswept  beavertail, skeletonised hammer, large silver match trigger, wrap around rubber like grips and an extended magazine with a protruding plastic bumper are are the most obvious. Novak rear combat sights, a taller front sight, dual safety and

Saturday, 1 June 2013

The Avalanche has started.

Airsoft projects... gotta love em.

Next - a TM/PDI L96 AWS in Olive Drab. Okay, no OD rifles in the UK, black then. Haven't ordered the rifle yet but have got an AirsoftPro aluminium loading ramp in my paw with a Laylax precision cheekpad and Laylax QD swivel adaptors on their way; along with some MP40 110 round magazines for the Sten gun I don't have yet! That's for my WW2 British para project. Oh, and a King Arms QD P90 Silencer. At least I do have a P90 to attach it to.

Pistol projects are currently on hold. Still have a Colt .25 that works great but looks like crap after I sanded the shit out of it. The slide quality is pretty poor and pitted so really needs filled and sanded smooth before a respray. I have bits to rebuild a TM Deagle as a chrome version; albeit with black controls. Could really do with a silver inner barrel though. I'll get some pics of the Colt up shortly.


Monday, 6 May 2013

Sniper rifles. Their part in my downfall.

 I like sniper rifles. I have four. A TM PSG-1, a Tanaka AICS, a absolutely mentally customised and painted PDI/TM-G-Spec - currently without an inner barrel - and a Chinese knockoff of Maruzen's weird SR2; Weird looking but currently my tool of choice.

The PSG-1 was bought as  project to and when last tested managed to double tap 0.29 AGM's out at just over 400fps. The double-tap issue has never been solved. To be fair it's an overly long, creaky piece of kit that'll never see a skirmish site. The scope and bipod are pretty cool though.

The Tanaka is a beast. PDI 6.01 barrel and a new hop chamber with the bolt modified with a DIY power adjuster. Both mags have been uprated with some uprate kit I can't remember the name of. An AI type bipod rounds it of. It's heavy and despite copious amounts of tinkering completely unreliable and inconsitent. Whihc is a shame because I'd dearly like it to work.

The G-Spec now looks nothing like a G-Spec and is an Olive Drap kryloned cannon. Nothing wrong with it though, fires at around 500fps with a 0.2 although it's barrel currenly resides in the Tanaka. I've just, well, never really liked it after I'd finished it. 

The ACM SR2 is a strange looking thing but surprisingly accurate and with a bit of fiddling about with hollowing the piston out to take a bigger spring actually quite powerful. It's lightweight, short and I actually like it.

Of course, what I actually need it a stupidly upgraded TM L96 AWS...
   

Sunday, 24 June 2012

Habla Colt 45?

Well, I took the plunge and purchased a 45 - okay another 45 - but this time it was a Colt. A Tokyo Marui Colt 45 MkIV Model 70 - a real 45 - as opposed to those hi-capa do-hicky efforts. It's basically an updated version of the M1911A1 but with a larger safety, a slightly extended and reshaped beavertail and a slightly wider gap in the rear sight - apparently, I haven't compared it to the 1911 - it's not here yet :) 
As a skirmish gun it seems very nice. Being me, I couldn't just leave it as is and added a PDI 6.01 Palsonite barrel and an upgraded recoil spring.
I bought an M7 holster - WW2 type shoulder holster but left handed version - and to say it was a tight fit would be an understatement. Sooo... I soaked the holster in warm water, wrapped the gun in a freezer bag, forced it into the holster and left it to dry overnight. I then got out some leather cleaner, cleaned the holster with that and then applied copious amount of leather balsam (lanolin and beeswax) left it to soak in and then gave it a good polish. Perfect. Now, to most real steel shooters, my treatment would be considered holster abuse and complete overkill for a leather holster since it's supposed to do... yadda, yadda, yadda, yawn. Yeah, right. I want to get the gun out of the holster when I need it - the press stud strap can hold the gun in. As far as I'm concerned it it now works as required.  

Sunday, 29 April 2012

Baofeng UV-5R Transciever

Well, the first of two radios has arrived and it looks pretty cool. It seems a sturdy little bit of kit, appears to have a considerable number of options including FM radio and LED torch on the top - disappointed by the lack of a built in toaster though...  Anyhoo, I got a programming cable and a mini-cd of software for this one and quickly fired it into the PC. After operating in stupid mode for some minutes I quickly figured out that my 64-bit notebook would probably work better with the 64-bit USB driver than the 32-bit one. I manually typed in all the channels I wanted - FRS/GMRS and PMR446 - and proceeded to plug in the radio. It wouldn't connect; kept giving me an 8020 error. After much head scratching and searching of the web I found the latest version of Baofeng's software, downloaded that and run it. Same problem. I then spent an interesting(ish) hour perusing ham radio forums tracking down a solution. I downloaded a little program called CHIRP and proceeded to use this. It's actually a fantastic little piece of code and the radio was up and working in next to no time. Some folks might not bother with the hassle of programming the radio, and by hand it's a daunting task, but certain things can only be done via the PC (like putting names to the channels) so getting the USB cable and downloading the CHIRP software is a no brainer. I've set all the FRS and PMR channels to low power as standard with the GMRS left on high power and used all the default names from CHIRP.
The CHIRP software is updated daily (!) so here's a link to the files http://trac.chirp.danplanet.com/chirp_daily/   just find the latest file and use the download enclosed.
Oh, the fishing reel bags arrived and look ideal for the headsets but I'll need to remove the aerials from the radios for them to fit. I've got some closed cell foam kicking about and I'm going to use that to modularise the interiors.

Tuesday, 24 April 2012

What we have is a failure to communicate - not anymore...

I decided it was time to consolidate all the radio based crap I have accumulated into a big box, stash it at the back of the cupboard and start afresh. Basically I wanted two radios - one for me and one for my imaginary friend. After a long search and reading various reviews I decided on the Chinese made Baofeng UV-5R. They appear to have some distinct advantages, the main one of which appears to be much cheapness for a lot of tech. They cover 400-480Mhz which I have reliably informed will cover the PMR466 band and the US GMRS/FRS bands - although, to be fair, the 'reliably informed' is via an airsoft forum so could as easily be 'a wild guess'. Time will tell, since they've still actually to get here. The radios look, at least IMHO, pretty tactical without resembling the half bricks that are actual service radios. Of course, real military radios would be really cool and gucci but since they operate on different frequencies, comms with anybody other than my imaginary friend would be somewhat curtailed. Apparently, these little Chinese toys can listen to two channels at the same time and can be programmed from your PC via a USB cable. They have a standard two pin Kenwood connector to attach a PTT or basic headset.  I ordered them separately from different companies on ebay mainly from the point of view of reducing the odds of being huckled for customs and handling charges. One of the orders includes the required USB programming cable. At £75(ish) for both they seem like a pretty good buy.

Of course, radios need headsets - yes they do - and the new Ztactical Evo III headset in Olive Drab looked ideal. You can swap the mike around to either side and they have a standard military plug to connect to a PTT. I've not really been a fan of throat mikes although I have three or four kicking about and I have an combined in-ear headset/mike which is quite clever but it doesn't fit particularly well in my ear. I also have the the older fixed mike Cavalvy version of the one pictured and like it but at that point it came with combined PTT. The new one plugs into a separate PTT allowing you to leave the radio attached to your gear when taking it off without almost strangling yourself trying to disengage yourself from your headset. The picture is a butchered version of the one on the Ebairsoft.com site where I bought two of them as well as a couple of separate PTT units. Having bought this lot I figured I could do with somewhere to store them so again a trawl though ebay brought up the idea of using a couple of smallish green zipped padded bags intended for storing fishing reels. They look like they'll hold the radio, headset and PTT and for a mere £3.20  each I figure they're worth a punt. 


A Hi-Capa or four


Here's a selection of the handguns I have - four Tokyo Marui Hi-Capas. The top three are fitted with Tanyo-Koba grips - which allow the 5.1s to fit a Blackhawk 1911 CQB SERPA holster. Unfortunately, the 4.1 doesn't fit due to the extended dust cover frame. The two black guns have PDI 6.01 Raven inner barrels and the silver guns have PDI 6.01 stainless inner barrels. All the guns have Nine Ball hop rubber and valve routers. The black 5.1 has a black kryloned barrel, black trigger, hammer and recoil rod fitted. It was going to have a Night Warrior slide but alas it needs the Night Warrior sights - supplies of these appear to have vanished off the face of the planet. The silver 5.1 has a TM 5.1 Match slide and an alloy trigger. The black 4.3 has a dual safety fitted and the silver 4.3 has an alloy outer barrel. The original plan was to uber-pimp all of these with alloy slides and barrels but given the so-so results I've had with these guns and being unimpressed with my efforts with my Desert Eagle and a Zeke kit I've decided that the grief ratio, not to mention the cash spent, isn't worth it. I've stripped out the alloy slides and, except for the silver 4.3, the alloy/steel barrels and resorted to the high speed moving bits the designer intended. I'll stick to minor tweeks and and performance upgrades from now on, Probably... 

The backdrop is a piece of Auscam fabric I picked up from ebay. The plan is to take a Halfords five drawer plus lid section metal tool box  put some thin foam in the bottom, use some neoprene tape to make rough shapes for the guns then line the drawers with the fabric in a similar fashion (hopefully) to some of the recent Tokyo Marui handgun boxes. Should allow storage of 20 handguns with space in the top for a  silenced KSC Mac11 and a KWA MP9 - I think I need to make a wheeled base for it! 


Thursday, 23 February 2012

Acquisitions

Recent acquisitions include a Tokyo Marui 4.3 Hi-Capa and a DBoys SCAR-H. A Biohazard M9 - the all-metal TM clone - is winging its way from Hong Kong as I write as is a PDI Raven barrel for the 4.3 Hi-Capa and a short stock motor for the spare UMG gearbox.

I also bought a number of bits off of Mike at the Elite Shooting Centre; mainly original TM part he had left over from building custom guns. A Hi-Capa Match slide, a Night Warrior slide and two 5.1 barrels as well as a complete chrome frame and slide for a Desert Eagle - all original TM, brand new and £70 all in. I also added the Nine Ball Hop Rubber and Nine Ball Gas Router which I will fit into the 4.3 when the barrel arrives. Of course, I forgot to order a dual-safety for the 4.3.

Externally, the Tactical 4.3 is looking the business - black slide and receiver, with olive drab Tanio Koba grip and dual safety. I left the original black hammer spring housing which I think looks better. The black 5.1 is getting the metal slide and barrel replaced with an original TM Night Warrior slide and barrel. Unfortunately, original TM barrels for the 5.1 are chrome so I've sprayed one black and it looks fine. If it develops a couple of scuffs it will still look okay since it's got the chrome underneath the Krylon. It's currently sporting a single sided safety but I'll get a dual safety off Mike soon.- I'm sure the Nine Ball ones are very nice but are over double the price of a TM original. I did discover that a 4.3 Hi-Capa, even with a Tanio Koba grip won't fit a Serpa without some serious Dremel-Fu. So its house is currently a UTG belt holster off of ebay.

The Dboys is very nice for the money. For £219.99 it's fine. Landwarrior were the only ones who had it in stock and I wanted a look at it first so I took a trip over at the weekend. There were a coule of niggles, the front barrel assembly was loose so I tightened it up but in the process noticed that the front allen bolt was just turning in the slot. When I managed to dig it out I discovered that it was stripped - no big deal but annoying. The fire selecter is a bit ropey with very indistinct selection but I've got a mod in mind to fix that. The battery is in the folding stock and power transfer is clever if somewhat agricultural but does solve the problem of wires showing - basically the hinge uses metal shims to transfer the power. through to the gearbox. The wire quality seems pretty poor but I'm looking to fit an AWS Stealth mosfet anyway - I would have preferred an AWS Raptor mosfet but I've got the rear-wired Stealth kicking about that was originally destined for the Dboys SPR. I'll renew the wires when I do that.  

Thursday, 5 January 2012

Colt .25 ACP mods

I bought an HFC Colt .25 off of a chap on one of the forums. Bit dear but I'd always fancied one. It looked quite nice (from a distance) but was pants. Nothing to do with the seller though! Now most people would have put it down to experience and foisted it off on some other unsuspecting forum chairsofter. Not I, I promptly dismantled it - just to have a look at how it worked of course. This required a cunning plan, which I didn't have, but brute force and a lot less cunning seemed to suffice and it was soon down to its component parts. By jove they were sh*t.

Some polishing of the internals, a bit of dremelling and it was 'tuned'. Or at least working to a more satisfactory level. Put back together it was much smoother and fired pretty well but now looked distincly scruffy. Of course, I couldn't leave it that way. Not forever anyway.

I bought some lead strip (for weighting golf clubs apparently) with the idea of adding some heft and some Milliput to fill some of the original gaps in the seams but mainly the ones I'd caused getting it appart. After dismantling it I put as much of the lead strip inside as I could. It only added around 30 grams but did take it up to 190g all in. So happy with that. I may have been able to get another gram or so in but it just wasn't worth the effort. The gas resevoir was leaking but that was quicky solved with some silicon grease and teflon tape. More polishing of the internals has led to a much smoother action that I'm now quite delighted with. It's quite grin enducing. Externally though the gun is now down to a black and orange surface waiting to be filled, filled and painted. When I can be bothered.   

Detonics Serpa

I needed a holster for my Detonics and seen a DeSantis ITP holster that appeared quite good. It was cheap(ish) and arrived quite promptly from the USA - a distinct but pleasant surprise since most things I order from the States seem to have delivery times based on phases of the moon or planetary alignment. Anyhoo, it worked great looked the dogs and was as uncomfortable as feck. NEXT!!!

Que a Blackhawk CQB. I've got one and the Detonics fitted fine but the holster was a tad big for the size of the gun. I debated chopping it up but since it's a real left handed model opted to order one of the cheaper Sportster ones. Also left handed. It arrived as per normal USesque delivery times but worked fine and has now been dremelled down to Detonics size. I could probably take just about another centimetre off the length of the holster but this would take it past the reinforcing point and it may end up too flexible. I'm still thinking about it though and since I have some fibreglass kicking about somewhere I may use that to support  around the end.

In the mean time the holster works a treat. Now I  need something for these two spare mags...